Skating 101: The Edges Primer
Note: this post probably won't display well on mobile, apologies if you're reading via that medium!
Edges! I'm talking about them, other skaters talk about them, they're insanely important to most disciplines of ice skating and you want to know more! Or you don't and are just reading every entry on my blog because you love me, thank you! Experienced skaters can simply skip this post, move right on by, it's nothing new, but there is a nifty little picture or two. This post is mainly for anytime I reference edges elsewhere on the blog and need an explanation link back for those less familiar with this sport.
Most forms of ice skating are basically all about them edges. In fact, the technical criteria that differentiates two similar seeming jumps (the Flip and the Lutz) is based entirely on which edge of the blade you're on for takeoff.
So let's begin.
Non-skaters tend to imagine that the flat of an ice skating blade (the bit that goes on the ice) is a knife thin, fine point. They're actually a good deal thicker than that, about a third the width of a DVD case spine... Okay that doesn't seem much more significant but it's a big difference if you actually compare a knife width to it. People also think of the flat of the blade as just that, completely flat. It's actually hollowed out like an arch. Not a crazy hollow - we're not talking Arc de Triomphe here - more like a dip connecting one side of the blade flat to the other, creating a point at either side. I don't know why I'm going to so much effort to describe this as there's already a picture to give you an idea. Anyway, these points are the edges you use when skating. They're also still not as sharp as a knife edge so get the whole knife thing out of your heads before you stab someone.

As you apply weight and a degree of lean to one foot while in an ice skate then the pressure created is pushed to either one of these points on the blade causing it to dig in to the ice. The fact that the points are curved on the sides by the hollow means that the blade will begin to make your path curve instead of travel in a straight line. Furthermore, the reduced blade contact means reduced friction so you should glide further and faster compared to skating on the flat of the blade.
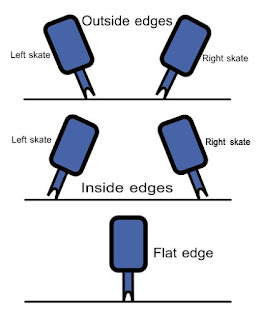 Now see this attractive diagram with blue blocks and grey blades, which helpfully illustrates the edges for each foot. This leads to the acronyms "LFI" for "left forward inside edge" and "RBO" for "right backward outside edge". You can guess the rest.
As a lot of skating moves rely on use of these edges then they tend to get acronyms too. For example, 3 turns end up as "LFO3" and "RBI3" for "left forward outside 3 turn" and "right backward inside 3 turn" respectively.
I'm going to avoid using these acronyms where I can in the blog but it's useful to know what they are nonetheless. Not least to prove I have actually learned something since I started skating!
Most people tend to stand on the inside of their feet - and thus the inside edge of their blade - so you can experience a basic inside edge glide fairly easily by simply gliding on one foot and bending your skating knee. Your foot is likely already resting on the inside edge so bending the knee adds the necessary pressure to move the blade from the flat to the inside edge point and away you go.
Outside edge is a bit trickier because instead of leaning inwards (where you can just put your non-skating foot back on the ice if you feel unsteady) you have to lean to the outside of your foot, which most people find less fun as there's no easy other foot to drop and catch you if you lose your balance.
Overall though, that's it! The basics of edges simplified to a fine point... See what I did there?
Now get on the ice and practise those edges!
Most forms of ice skating are basically all about them edges. In fact, the technical criteria that differentiates two similar seeming jumps (the Flip and the Lutz) is based entirely on which edge of the blade you're on for takeoff.
So let's begin.
Non-skaters tend to imagine that the flat of an ice skating blade (the bit that goes on the ice) is a knife thin, fine point. They're actually a good deal thicker than that, about a third the width of a DVD case spine... Okay that doesn't seem much more significant but it's a big difference if you actually compare a knife width to it. People also think of the flat of the blade as just that, completely flat. It's actually hollowed out like an arch. Not a crazy hollow - we're not talking Arc de Triomphe here - more like a dip connecting one side of the blade flat to the other, creating a point at either side. I don't know why I'm going to so much effort to describe this as there's already a picture to give you an idea. Anyway, these points are the edges you use when skating. They're also still not as sharp as a knife edge so get the whole knife thing out of your heads before you stab someone.
 |
| Too much arch! |
 Now see this attractive diagram with blue blocks and grey blades, which helpfully illustrates the edges for each foot. This leads to the acronyms "LFI" for "left forward inside edge" and "RBO" for "right backward outside edge". You can guess the rest.
As a lot of skating moves rely on use of these edges then they tend to get acronyms too. For example, 3 turns end up as "LFO3" and "RBI3" for "left forward outside 3 turn" and "right backward inside 3 turn" respectively.
I'm going to avoid using these acronyms where I can in the blog but it's useful to know what they are nonetheless. Not least to prove I have actually learned something since I started skating!
Most people tend to stand on the inside of their feet - and thus the inside edge of their blade - so you can experience a basic inside edge glide fairly easily by simply gliding on one foot and bending your skating knee. Your foot is likely already resting on the inside edge so bending the knee adds the necessary pressure to move the blade from the flat to the inside edge point and away you go.
Outside edge is a bit trickier because instead of leaning inwards (where you can just put your non-skating foot back on the ice if you feel unsteady) you have to lean to the outside of your foot, which most people find less fun as there's no easy other foot to drop and catch you if you lose your balance.
Overall though, that's it! The basics of edges simplified to a fine point... See what I did there?
Now get on the ice and practise those edges!


Comments
Post a Comment